December 22, 2011

Bayou Kitchen Breakfast

I just moved away from the Oakdale neighborhood (aw, miss you already roomies!) and, while compared to one of the Ends or downtown, there's not much out by USM and Woodfords Corner, there are a few places worth venturing out Forest Ave. for.

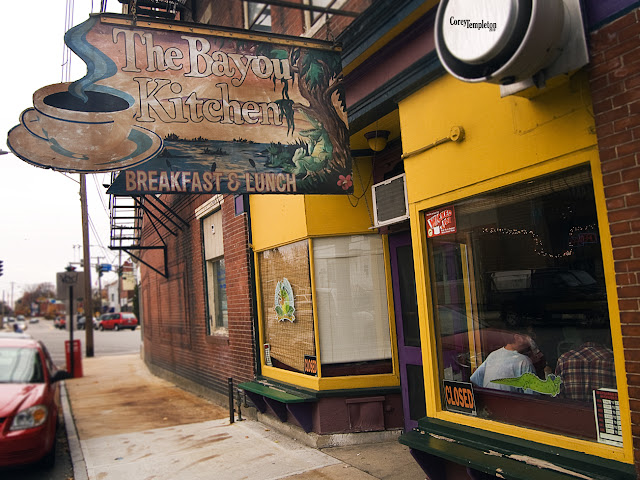
My roommates introduced me to Bayou Kitchen, and it's been my go-to brunch spot for a while now. Well, specifically when I'm craving huevos rancheros. Bayou Kitchen serves the best one I've found in the city. 

Photo by Corey Templeton of Portland Daily Photo

But Bayou Kitchen is easy to miss.  It's across Deering Ave. from Artist & Craftsman Supply in a small, unassuming storefront.  Once you step inside, you're greeted warmly and seated at one of the 25 seats in the place. 


The menu has a Cajun bent, with grits Andouille sausage, Jambalaya, and Gumbo.  Like I said though, I've only ever had the huevos rancheros.  Lots of black bean or beef chili and cheese, wrapped in a tortilla, topped with two eggs, sour cream, and salsa.  Pretty much all my favorite things together. And then your choice of home fries or grits (skip the grits). 


This is quickly turning into one of those one-plate places for me. You know the sort, where the one item you've had is so good you're afraid to order something else for fear of disappointment and regret. And I usually have enough of those served up with my morning-after brunch as is.

But maybe I can return for lunch and not be tempted by the huevos rancheros; after all, they serve gumbo and Jambalaya, which might sway me.

So check out Bayou Kitchen for a brunch that's a bit different than the tried and true served up at Becky's, Miss Portland Diner, Marcy's, etc. Between the charming service and the southern food, I bet you'll find something that makes you want to return.

Pro tip: due to the size of the restaurant, I recommend getting out there early, as I've seen crowds piling up outside after 10am or so. 

December 19, 2011

Obscure Holiday Cocktail Tasting, Vol. 3

The third annual Obscure Holiday Cocktail party was a raging success!  For the third (!!!) year in a row, local Portland bloggers gathered, each bringing an obscure holiday cocktail.  

We had five cocktails, and only one (mine) was a bit iffy.  Fortunately it came at the end of the evening, when no one cared too much.  As usual, thanks to Uke for the cheese pairings.  Spot on, natch.


The Christmas Bellringer, paired with a Caprichio De Cabra, a goat's milk cheese, was a delicious mix of Gin, Cointreau, Frangelico, and freshly squeezed orange juice.  Adam Dawn (whoops!) of Appetite Portland contributed this cocktail and with its refreshing citrus and herbal flavors.  The salty feta-like cheese was a nice foil.

I could have drank A. of Portland Food Map's cocktail all night long- a Greek Air Mail.  A traditional Air Mail has rum, but A. substituted in Greek Metaxa (a brandy-wine blend).  Shaken up with lime juice, honey, Q Tonic, Bitters and mint, the Air Mail was not too sweet or boozy- a totally drinkable cocktail.  These drinks would make a good pitcher specialty drink for your holiday or New Year's party.


The Air Mail was paired with Keen's Cheddar, an English clothbound aged cheddar.  I mean, clothbound cheddar.  How can you go wrong?


The Lion's Pride, made with St. Germain, Gin, one egg white, dash Peychaud Bitters, Lime juice, and topped with lime zest and black pepper was adapted from a cocktail that Dawn and Adam had at Lion's Pride Pub in Brunswick.  This cocktail was spicy, citrusy, and floral/herby, and made me want to get to Lion's Pride even more.

S. paired it with Valencay, a fresh goat's milk, covered in charcoal ash that was almost like a goat cheese mousse.  It was... strange, but stood up to the tartness of the cocktail.


Whispers of the Frost, by Vrylena, was Bourbon, Sherry, Port, powdered sugar, served with slices of lemon and orange.  I did not witness the particular alchemy that made these ingredients taste like a citrusy mulled wine, but  it was strong and delicious.  Perfect for sipping at night in front of a foggy window as you watch the snow fall on the pines.


Paired with a Bayley Hazen Blue, a raw, aged, cow's milk blue from Jasper Hill Farm in Vermont, a drier, saltier blue, helped to tone down the alcohol-y notes in the cocktail.  A nice nibble.

Finally, my contribution of the evening, Tom and Jerry, a frothy egg, milk, bourbon, rum punch.  It's like egg nog, but more finicky.  Inspired as always, by John Meyers' The Land of Forgotten Cocktails column (do read his backstory on the drink to learn how the cartoon Tom and Jerry came to have their name), I tackled a more ambitious drink, involving whisking egg whites- by hand, ahem- and the words "be careful not to curdle."  

Hmm, sounds like a great idea to attempt after 4 cocktails.  Fortunately, everyone else was 4 cocktails in as well, so if it was a little curdled or strong, it went largely unnoticed.  Or largely unsaid.  Whatever, same thing.


I followed the Esquire magazine recipe, using bourbon instead of whiskey, because I'm apparently a "die-hard Dixiecrat," (and am OK with that).  But I recommend using a larger glass, because between the bourbon soaked egg batter and the 2 oz. bourbon/rum per glass, in these cute short glasses, the drink was a little strong. 


Uke gave up on matching milk and egg based drinks with cheese and went with Ghost Pepper Chili Salt Chocolate Bark and Chocolate Covered Marcona Almonds.  The salty, spicy, and sweet combination of the drink and the chocolates worked wonders.  Uke also brought great pickled beet deviled eggs, that would make a nice, if not labor-intensive holiday potluck recipe.

Again, we were so happy this year that all our cocktails turned out to be winners.  I would recommend any of them to make for holiday parties or to spice up a slow winter evening.

Many thanks to Dawn and Adam for hosting us, my fellow bloggers for contributing food and drinks to enjoy, and you for reading.  Happy holidays!

December 15, 2011

Taco Escobarr Review

I have a problem, and its name is Taco Escobarr.

Have you seen my shit list? It's a piece of paper that says 'Taco Escobarr?'

Photo by Dawn Hagin

Sigh.  I'm thinking, on one hand, it's not *that* bad, and if you write a strongly worded review, you may come to regret it for many reasons. Maybe I'm just crabby because it's raining heavily, I didn't bring lunch (or a raincoat), I'm wearing cute flats and tights, and I parked alllll the way in the back of the lot.

None of these things, however, excuse the greasy, declining taco experiences I've had at Taco Escobarr.

Photo by Dawn Hagin

I've eaten at Taco Escobarr, the newish, hip taco joint, opened by the Nosh Kitchen Bar guys, 7 times now.  I've eaten at the bar, at the hightop tables; by myself, with loud groups, on a date; I've ordered burritos, all kinds of combinations of taco fillings, shells, and salsa. The only thing I haven't tried are the sides and desserts.

At first, I was enamored. The tacos are cheapish (3 for $8 or 3 fish tacos for $10), the salsa are nice and spicy, and the bar environment is fun. They have Miller High Life, Busch, and Maine Beer Co. on tap (not a complete list).


Photo by Dawn Hagin

I had good experiences with the puffy tacos, which are deep-fried soft shells that puff up and crackle wonderfully when you bite into them. I was into the picadillo or ground beef filling.  So far we're firing on all cylinders for a taco joint.


But then around my 5th visit, the puffy taco shell was greasy. And not very crispy. I thought, are they making these ahead? Sure enough, I peered into the open kitchen (past the not-to-busy-cooks, I might add) and saw a stack of pre-fried puffy tacos. That explains why my food came so very fast.

My most recent nail-in-the-coffin visit saw a very long wait for our food (30 minutes), withering treatment from our server (including a scraping off of toppings when J. pointed out that she requested her tacos plain), and the dreaded combination of greasy, soggy puffy shells and dried out pork filling.

However, most importantly (and infuriatingly), I will continue to eat there.  

The taco bar is centrally located when you're out for First Friday or other Arts District partying (and have temporarily OD'ed on Otto pizza). The tacos are cheap, better quality than $.99 tacos at Amigo's, and a crowd-pleaser if you're out with a group. Plus, there's an element of 'chasing the dragon,' in that I am hoping that their tacos will sing as they did on our first few encounters.

I know this is going to be controversial, so let's hear it.  What say you of Taco Escobarr?

December 14, 2011

Veggie Cream Cheese

I vascillate between being too lazy to make my own breakfast (aka really wanting a bagel, aka hungover) and being too cheap to pay for a meal that takes 5 minutes to consume.  Yesterday, I was in the too-broke-to-justify-a-bagel camp (I was not, however, hungover.  Go me!). 


So I concocted this really quick, reasonable facsimile of a Mr. Bagel bagel with veggie cream cheese.  I took about two heaping tablespoons of cream cheese, and mixed in grated carrot, broccoli, and onion.  A little salt and pepper, and tada!

White scala bread from Rosemont Market is the best.  Now I just need this Everything Bread + Bagel topping from King Arthur Flour, and I'll never want Mr. Bagel again (...ok, I didn't meant that).

December 11, 2011

Cook's Illustrated Cookbook Review

I have mixed feelings about the Cook's Illustrated publications.  While I am lured in by their promise of perfectly seasoned dishes at the end of the rainbow, I frequently find that the recipes don't mix with my style of cooking. 

Rarely do I pick a recipe, go to the store, purchase every single ingredient required and come home to make the meal.  Rather, I poke around in the fridge and cabinets, browse through a few recipes, and mix what I have with a few recipes I saw.  Sometimes this means I sub an onion for a shallot (oh, the horror) or white wine for vermouth. 


And this is where Cook's Illustrated and I fail to see eye-to-eye.  Developed in 'America's Test Kitchen' these recipes have been deconstructed and tested from the ground up.  So if they tell you to use a shallot, that means they've tried the recipe with yellow onions, without shallots, etc.  When they say shallot, they mean shallot. 

Chicken legs, over spinach, mushrooms, and polenta.  With ONIONS.  *gasp*
And I'm ok with people who seek a Platonic ideal of every dish they make (the uber chili?).  I'm just not one of them.  Ultimately the point of dinner is to satisfy a need.  And if I'm in a mood to take some time to make it in a tasty way?  Peachy.  But I don't have all night here, people.  Nor a limitless bank account.  Sometime the shallot becomes an onion. 

Recommendation?  As a gift for a new cook, I'd rather give the Joy of Cooking or Bittman's How to Cook Everything.  But this cookbook sure is extensive (800+ pages), has lots of great cooking tips that CI is known for, and may appeal to the cook that thrives when given meticulous, detail-oriented* instructions. 

Thanks to Rabelais Books for providing the review copies for our Cookbook Review-o-rama.  See the Portland Food Map for more book reviews from area bloggers. 

*Alternate title to this post:  'Detail-Oriented Is Not My Middle Name.'

December 7, 2011

Cheesemaking Workshop with Appleton Creamery

Yesterday, I took a cheesemaking class at the University of Maine, sponsored by UMaine Cooperative Extension and taught by Caitlin Hunter of Appleton Creamery.  It was a nine hour (!!) long workshop and we made jack, ricotta, and mozzarella.

We started with the jack, which is an aged cheese; it'll be ready in February or March.  That took all morning, and then in the afternoon we made ricotta from they whey of the jack and a 30-minute mozzarella (similar to the process I learned at Wolfe's Neck Farm last year).


Here Beth Calder, UMaine Extension Food Science Specialist (left) and a class participant, chat with Caitlin Hunter (middle) over 5 gallons of goat and cow's milk.  The milk is resting in a sink full of hot water, as we slowly raise the temperature to 88*F.


Jack is a cheese that takes a mesophilic or 'warm-loving' starter. Adding a starter culture kicks off the acidification process (aka fermentation) and gives it that great cheesy flavor.  After the culture was added at the right temperature and the cheese rested for a while, we added rennet.

I learned a lot about rennet and its sources from Caitlin.  Rennet is an enzyme that causes the milk proteins to coagulate or stick together and separate from the whey.  Since milk is about 89-90% water, with the rest being fats and protein, the process of acidification and then adding rennet makes all protein come together in a solid curd and pull away from the whey.

Rennet can come from animal, plant or fungus sources, and most rennet used in American cheese or available for cheese making is made in a lab, through the process of genetic manipulation, making it a GMO.  Boo-urns.  (This Madison Market article explains it nicely.)


Here Caitlin is cutting the set curd into 1/2-inch squares, which helps even more whey be drawn out of the curd.  The drier the cheese, the smaller the curd, since small pieces of curd have more surface area, which allows more whey to escape from in between the tangles of milk protein strands.


We slowly heated the curd again, while stirring it, to help the curd shrink and release the whey.  I could tell this step was where Caitlin's cheese making experience came in.  Knowing when the curd was ready to be pressed requires a 'texture test' done by taking a handful of curd, squeezing it, and observing the results.


When squeezed, the curd should stick together and the pieces should have the texture of cooked chicken breast when pulled apart.  Caitlin frequently stuck her hand in the curd, swirled it around, and invited us to do the same to feel the curds bounce off the backs of our hands.


This step took a long time, but once all the curd was sufficiently dried out, we let the curd rest for a few minutes and then strained the curd into a colander lined with a cheese cloth.


After all they whey had been scooped off and saved for ricotta making, the curd dumping began in earnest.  5 lbs. of curd when into that cheese cloth!


Then the curd was gathered up in the cloth, pressed firmly, attempted to be shaped into a round ball, and placed under a weight to rest for a few hours.  The weight system was simple- two cutting boards above and below the cheese, with a large water-filled stockpot.  The first pressing was 8 lbs. (a gallon of water), and then 25 lbs. (4 gallons of water).


The jack cheese needs to be aged for a few months (in the refrigerator, even), so the cheese was raffled off to a lucky person- my boss!  

At first I was disappointed that I didn't get to babysit the cheese, then I realized that this really was the best outcome, as Kathy will take care of the cheese and then share it with me in March.  Ha.


Caitlin brought a jack she made a few days ago, that was ready to be oiled.  The cheese needs to be oiled every few days at the beginning of the aging process, so it can build a protective rind.  

Caitlin makes her oil rub out of cocoa, cayenne, and olive oil.  Here's where you can get creative with spices, so Kathy is going to go with turmeric, cayenne, and olive oil.


While this may seem like a lot of overwhelming steps that have a lot of room for screwing up, I actually feel like this is an accessible aged cheese for the beginning home cheesemaker.

Ricki of New England Cheese Making has a nice picture tutorial of the jack recipe.  When you see her do it, it looks so simple!  I believe that I can replicate this cheese at home, and I'm excited to give it a try.


As a bonus, when you're done all of that, you have a lot of whey left over, which is perfect for making ricotta.  While we strained out most of the curd for the jack, there is still a lot left in the whey that can be drawn out through further heating and acidification.  Additionally, you can increase the yield of the ricotta by adding some whole milk to the whey.

All we did was heat the whey to 160*F, added some whole milk, kept heating to 180*F and added 1/4-1/2 cup of bottled lemon juice.  Then, as the curds rose to the top, we ladled them off into these cute little ricotta baskets and let them drain.  Voila, fresh ricotta!  Dead simple.  Again, check out Ricki's tutorial for the recipe.

Happy cheesemaking, kids!  And if you ever see Caitlin's Beginner Cheesemaking Workshop offered in your area ($80), I highly recommend it.  Totally doable skills.